 Posted by Edward Curtin on August 25, 2016
The hard part is over. You’ve taken the time to measure your window frame and choose just the the right insert replacement windows for your home. Now it’s time to install!
This process may appear challenging, but follow these simple steps and installing your insert windows will be a breeze.
Here are the tools you will need to get the job done:
|
|
Step 1: Remove the old window.
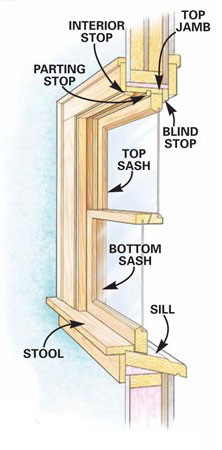
The new insert window will fit inside your existing window frame, so you will only have to remove the sash, exterior stop and inside stop from the existing window.
For the process to be safer and easier, install your new windows from inside your home.
 Here’s how to easily remove the old window:
- First remove the interior stop pieces (moldings) from the window using a broad chisel. Pull the nails through the backside of the stop pieces with a pair of pliers. *Be careful when removing these pieces because you are going to reuse them for the new windows.
- Pull the bottom sash out of the frame, cut the cords, and remove the sash. Remove the parting stops and take out the top sash. *Parting stops can be difficult to remove because of paint build-up; try using your razor knife or chisel. Remove the pulleys and the weights, remove the casing, and install insulation in the cavities where the weights were. Replace the casing, and caulk to seal it to the wall.
- Apply a bead of caulk at the joint between the jamb and the sill. Cut a piece of flashing tape (sometimes supplied with the window) 12 inches longer than the opening width and apply it to the sill and partway up the jambs on each side. Check the sill for level. If it is not level, place a shim 1/2 inch from either of the jambs to achieve level. Attach the shim with a finishing nail.
- Remove the outside sash in the same manner as the inside sash. Don’t remove the exterior stop from the window jambs. These stops will retain the replacement window when you install it.
Step 2: Prepare the Opening
Test the fit of the new window right away to be sure that you can finish the installation. Then, clean the window jambs and sill thoroughly.
If the old window had weights, drive the pulleys into the frame or remove them entirely. Fill any holes in the jambs or sill with caulk, and lay down a bead of caulk along the inside of the blind stop and the backside of the window stool.
Step 3: Install the New Insert
Rest the bottom of the replacement window on the sill and tilt the insert into place against the blind stop. If your window includes a head expander, position it over the top of the jamb first. Press the window tight against the caulked blind stop.
Loosely fasten the window into the frame with partially driven screws into the lower left and upper right corners. Next, close and lock the sash and measure diagonally across the new window – make sure to measure both diagonals. Your replacement insert will be slightly smaller than the window jamb opening to allow for shimming. The key to a window that operates smoothly and seals properly is getting the frame perfectly square and the sides straight. Slide shims behind the screw holes in the four corners and adjust them until the diagonal measurements from opposite corners are equal. Drive screws through the upper left and lower right hand screw holes.
Hold a level against the side jamb and slide wood shims behind each remaining screw hole until the side jamb of the window is straight. Snug up all of the screws and check to make sure the sashes slide easily and align perfectly where they meet in the middle. Be careful; overtightening the screws could warp the jamb. Cut off the shims with a sharp utility knife or reciprocating saw.
Replace the interior stops and nail them in place with 4d finish nails.
Stuff fiberglass insulation in the gap under the sill of the new window. Measure the size of the gap and cut the filler strip to fit. Use a sharp utility knife and straightedge or tin snips to cut the filler strip. Press the filler into place.
Caulk the joint between the new window and the blind stop and between the windowsill and filler strip.
You have successfully completed a window replacement installation! See, it’s not as complicated as it seems. A little time and patience goes a long way when it comes to home projects such as this.
For more great window ideas and guidance, visit our Windows Page today!


